Porsche Cayman R - Test Drive - Galleria 2 - amp/120


Warning: Undefined array key "amp" in /var/www/vhosts/motorionline.com/httpdocs/ftp.motorionline.com/www.motorionline.com/foto/dettagliofoto.php on line 66

Warning: Trying to access array offset on value of type null in /var/www/vhosts/motorionline.com/httpdocs/ftp.motorionline.com/www.motorionline.com/foto/dettagliofoto.php on line 66

Warning: Trying to access array offset on value of type null in /var/www/vhosts/motorionline.com/httpdocs/ftp.motorionline.com/www.motorionline.com/foto/dettagliofoto.php on line 66
Porsche Cayman R - Test Drive - Galleria 2 - amp
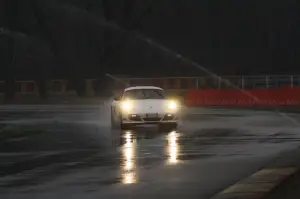
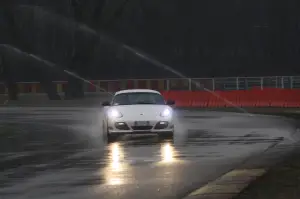
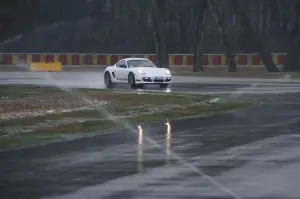
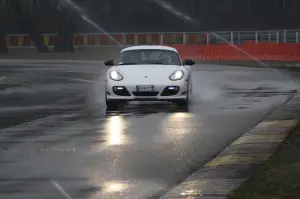
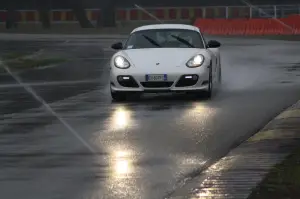
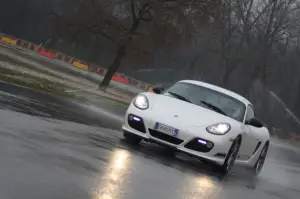
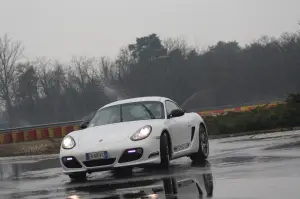
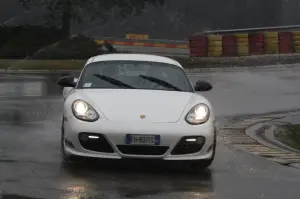
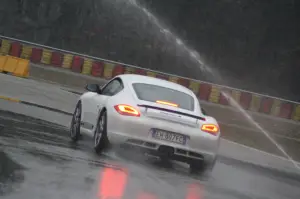
Porsche Cayman R - Test Drive - Galleria 2 (Foto amp di 120)

Visualizza Foto ad Alta Risoluzione (HD)

  • Porsche Cayman R - Test Drive - Galleria 2 - 1
  • Porsche Cayman R - Test Drive - Galleria 2 - 2
  • Porsche Cayman R - Test Drive - Galleria 2 - 3
  • Porsche Cayman R - Test Drive - Galleria 2 - 4
  • Porsche Cayman R - Test Drive - Galleria 2 - 5
  • Porsche Cayman R - Test Drive - Galleria 2 - 6
  • Porsche Cayman R - Test Drive - Galleria 2 - 7
  • Porsche Cayman R - Test Drive - Galleria 2 - 8
  • Porsche Cayman R - Test Drive - Galleria 2 - 9
  • Porsche Cayman R - Test Drive - Galleria 2 - 10
  • Porsche Cayman R - Test Drive - Galleria 2 - 11
  • Porsche Cayman R - Test Drive - Galleria 2 - 12
  • Porsche Cayman R - Test Drive - Galleria 2 - 13
  • Porsche Cayman R - Test Drive - Galleria 2 - 14
  • Porsche Cayman R - Test Drive - Galleria 2 - 15
  • Porsche Cayman R - Test Drive - Galleria 2 - 16
  • Porsche Cayman R - Test Drive - Galleria 2 - 17
  • Porsche Cayman R - Test Drive - Galleria 2 - 18
  • Porsche Cayman R - Test Drive - Galleria 2 - 19
  • Porsche Cayman R - Test Drive - Galleria 2 - 20
  • Porsche Cayman R - Test Drive - Galleria 2 - 21
  • Porsche Cayman R - Test Drive - Galleria 2 - 22
  • Porsche Cayman R - Test Drive - Galleria 2 - 23
  • Porsche Cayman R - Test Drive - Galleria 2 - 24
  • Porsche Cayman R - Test Drive - Galleria 2 - 25
  • Porsche Cayman R - Test Drive - Galleria 2 - 26
  • Porsche Cayman R - Test Drive - Galleria 2 - 27
  • Porsche Cayman R - Test Drive - Galleria 2 - 28
  • Porsche Cayman R - Test Drive - Galleria 2 - 29
  • Porsche Cayman R - Test Drive - Galleria 2 - 30
  • Porsche Cayman R - Test Drive - Galleria 2 - 31
  • Porsche Cayman R - Test Drive - Galleria 2 - 32
  • Porsche Cayman R - Test Drive - Galleria 2 - 33
  • Porsche Cayman R - Test Drive - Galleria 2 - 34
  • Porsche Cayman R - Test Drive - Galleria 2 - 35
  • Porsche Cayman R - Test Drive - Galleria 2 - 36
  • Porsche Cayman R - Test Drive - Galleria 2 - 37
  • Porsche Cayman R - Test Drive - Galleria 2 - 38
  • Porsche Cayman R - Test Drive - Galleria 2 - 39
  • Porsche Cayman R - Test Drive - Galleria 2 - 40
  • Porsche Cayman R - Test Drive - Galleria 2 - 41
  • Porsche Cayman R - Test Drive - Galleria 2 - 42
  • Porsche Cayman R - Test Drive - Galleria 2 - 43
  • Porsche Cayman R - Test Drive - Galleria 2 - 44
  • Porsche Cayman R - Test Drive - Galleria 2 - 45
  • Porsche Cayman R - Test Drive - Galleria 2 - 46
  • Porsche Cayman R - Test Drive - Galleria 2 - 47
  • Porsche Cayman R - Test Drive - Galleria 2 - 48
  • Porsche Cayman R - Test Drive - Galleria 2 - 49
  • Porsche Cayman R - Test Drive - Galleria 2 - 50
  • Porsche Cayman R - Test Drive - Galleria 2 - 51
  • Porsche Cayman R - Test Drive - Galleria 2 - 52
  • Porsche Cayman R - Test Drive - Galleria 2 - 53
  • Porsche Cayman R - Test Drive - Galleria 2 - 54
  • Porsche Cayman R - Test Drive - Galleria 2 - 55
  • Porsche Cayman R - Test Drive - Galleria 2 - 56
  • Porsche Cayman R - Test Drive - Galleria 2 - 57
  • Porsche Cayman R - Test Drive - Galleria 2 - 58
  • Porsche Cayman R - Test Drive - Galleria 2 - 59
  • Porsche Cayman R - Test Drive - Galleria 2 - 60
  • Porsche Cayman R - Test Drive - Galleria 2 - 61
  • Porsche Cayman R - Test Drive - Galleria 2 - 62
  • Porsche Cayman R - Test Drive - Galleria 2 - 63
  • Porsche Cayman R - Test Drive - Galleria 2 - 64
  • Porsche Cayman R - Test Drive - Galleria 2 - 65
  • Porsche Cayman R - Test Drive - Galleria 2 - 66
  • Porsche Cayman R - Test Drive - Galleria 2 - 67
  • Porsche Cayman R - Test Drive - Galleria 2 - 68
  • Porsche Cayman R - Test Drive - Galleria 2 - 69
  • Porsche Cayman R - Test Drive - Galleria 2 - 70
  • Porsche Cayman R - Test Drive - Galleria 2 - 71
  • Porsche Cayman R - Test Drive - Galleria 2 - 72
  • Porsche Cayman R - Test Drive - Galleria 2 - 73
  • Porsche Cayman R - Test Drive - Galleria 2 - 74
  • Porsche Cayman R - Test Drive - Galleria 2 - 75
  • Porsche Cayman R - Test Drive - Galleria 2 - 76
  • Porsche Cayman R - Test Drive - Galleria 2 - 77
  • Porsche Cayman R - Test Drive - Galleria 2 - 78
  • Porsche Cayman R - Test Drive - Galleria 2 - 79
  • Porsche Cayman R - Test Drive - Galleria 2 - 80
  • Porsche Cayman R - Test Drive - Galleria 2 - 81
  • Porsche Cayman R - Test Drive - Galleria 2 - 82
  • Porsche Cayman R - Test Drive - Galleria 2 - 83
  • Porsche Cayman R - Test Drive - Galleria 2 - 84
  • Porsche Cayman R - Test Drive - Galleria 2 - 85
  • Porsche Cayman R - Test Drive - Galleria 2 - 86
  • Porsche Cayman R - Test Drive - Galleria 2 - 87
  • Porsche Cayman R - Test Drive - Galleria 2 - 88
  • Porsche Cayman R - Test Drive - Galleria 2 - 89
  • Porsche Cayman R - Test Drive - Galleria 2 - 90
  • Porsche Cayman R - Test Drive - Galleria 2 - 91
  • Porsche Cayman R - Test Drive - Galleria 2 - 92
  • Porsche Cayman R - Test Drive - Galleria 2 - 93
  • Porsche Cayman R - Test Drive - Galleria 2 - 94
  • Porsche Cayman R - Test Drive - Galleria 2 - 95
  • Porsche Cayman R - Test Drive - Galleria 2 - 96
  • Porsche Cayman R - Test Drive - Galleria 2 - 97
  • Porsche Cayman R - Test Drive - Galleria 2 - 98
  • Porsche Cayman R - Test Drive - Galleria 2 - 99
  • Porsche Cayman R - Test Drive - Galleria 2 - 100
  • Porsche Cayman R - Test Drive - Galleria 2 - 101
  • Porsche Cayman R - Test Drive - Galleria 2 - 102
  • Porsche Cayman R - Test Drive - Galleria 2 - 103
  • Porsche Cayman R - Test Drive - Galleria 2 - 104
  • Porsche Cayman R - Test Drive - Galleria 2 - 105
  • Porsche Cayman R - Test Drive - Galleria 2 - 106
  • Porsche Cayman R - Test Drive - Galleria 2 - 107
  • Porsche Cayman R - Test Drive - Galleria 2 - 108
  • Porsche Cayman R - Test Drive - Galleria 2 - 109
  • Porsche Cayman R - Test Drive - Galleria 2 - 110
  • Porsche Cayman R - Test Drive - Galleria 2 - 111
  • Porsche Cayman R - Test Drive - Galleria 2 - 112
  • Porsche Cayman R - Test Drive - Galleria 2 - 113
  • Porsche Cayman R - Test Drive - Galleria 2 - 114
  • Porsche Cayman R - Test Drive - Galleria 2 - 115
  • Porsche Cayman R - Test Drive - Galleria 2 - 116
  • Porsche Cayman R - Test Drive - Galleria 2 - 117
  • Porsche Cayman R - Test Drive - Galleria 2 - 118
  • Porsche Cayman R - Test Drive - Galleria 2 - 119
  • Porsche Cayman R - Test Drive - Galleria 2 - 120

Torna alla Galleria Porsche Cayman R - Test Drive - Galleria 2